DbVisualizer对接FusionInsight
适用场景
DbVisualizer 10.0.21 ↔ FusionInsight HD 6.5 (Hive/Phoenix/SparkSQL)
DbVisualizer 10.0.21 ↔ FusionInsight MRS 8.0 (Hive/Phoenix/SparkSQL)
简介
SQL开发工具,如DbVisualizer、DBeaver、Squirrel是数据库开发的常用选择,虽然这些工具大多不提供原生Hive、SparkSQL、Phoenix的支持,但是通过它们支持的自定义JDBC的能力,我们可以与FusionInsignt提供的Fiber组件的JDBC接口进行对接,实现这Hive、SparkSQL、Phoenix组件的统一SQL查询。
- Fiber架构图
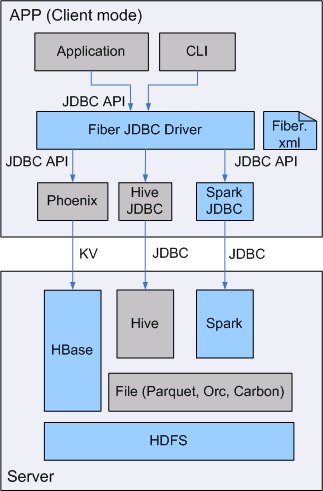
本文档主要描述在Window操作系统,DbVisualizer通过Fiber方式对接FusionInsight HD的Hive、Spark2x、Phoenix组件。
准备工作
-
登录FusionInsight Manager创建一个“人机”用户,例如:developuser,具体请参见FusionInsight HD产品文档的
管理员指南->系统设置->权限设置->用户管理->创建用户章节。给developuser用户授予所有访问权限,包含但不限于Spark2x、Hive、HBase。 -
已完成FusionInsight HD客户端安装,具体请参见FusionInsight HD产品文档的
应用开发指南->安全模式->安全认证->配置客户端文件章节。 -
已将集群的节点主机名与IP的映射关系加入到windows的hosts文件中
C:\Windows\System32\drivers\etc\hosts。 -
客户端机器的时间与FusionInsight HD集群的时间要保持一致,时间差小于5分钟。
-
Windows上已经安装好jdk1.8或者以上版本,并完成jdk环境变量配置。
-
Hive数据库已存在表student,数据类似于:
示例如下:
CREATE TABLE IF NOT EXISTS student(id INT, name STRING, class_id INT);
INSERT INTO student VALUES (1,'Tom',1);
INSERT INTO student VALUES (2,'Sandy',2);
INSERT INTO student VALUES (3,'Benny',3);
INSERT INTO student VALUES (4,'Tina',1);
Fiber认证方式配置
操作场景
Fiber的安全认证有kinit和keytab两种方式。具体参数配置说明可参考FusionInsight HD产品文档的业务操作指南->统一SQL(Fiber)->客户端配置章节。
前提条件
-
已完成准备工作。
-
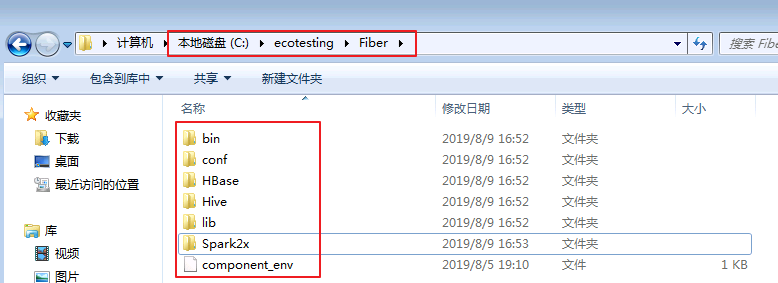
将FusionInsight HD客户端的Fiber、Hive、Spark2x、HBase客户端文件夹,拷贝至本地新建目录
C:\ecotesting。假设FusionInsight HD客户端安装于/opt/hadoopclient目录,则: -
将
/opt/hadoopclient/Fiber拷贝至本地C:\ecotesting目录。 -
将
/opt/hadoopclient/Hive拷贝至本地C:\ecotesting\Fiber目录。 -
将
/opt/hadoopclient/Spark2x拷贝至本地C:\ecotesting\Fiber目录。 -
将
/opt/hadoopclient/HBase拷贝至本地C:\ecotesting\Fiber目录。 -
将
C:\ecotesting\Fiber\HBase\hbase\lib\phoenix-core-4.13.1-HBase-1.3.jar拷贝至C:\ecotesting\Fiber\lib。
- 登录FusionInsight Manager的
系统->用户->更多(developuser)->下载认证凭证,下载developuser对应的认证凭证。将用户的 krb5.conf 和 user.keytab 文件拷贝到C:\ecotesting\Fiber\conf目录下。
操作步骤
使用kinit认证方式配置
-
从http://web.mit.edu/kerberos/dist/#kfw-4.0下载对应操作系统架构的MIT Kerberos并安装。
-
设置Kerberos的配置文件。将用户的krb5.conf文件重命名为 krb5.ini 放在
C:\ProgramData\MIT\Kerberos5目录下。 -
设置Kerberos票据的缓存文件
-
在本地创建存放票据的目录,例如
C:\temp。 -
设置Windows的系统环境变量,变量名为
KRB5CCNAME,变量值为C:\temp\krb5cache。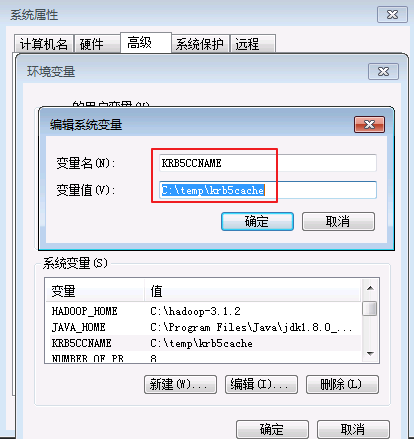
-
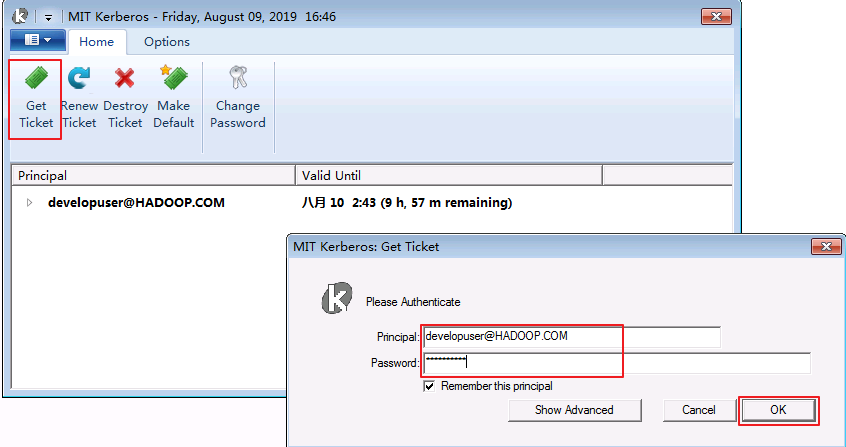
在Windows上进行认证
打开MIT Kerberos,单击 get Ticket ,在弹出的MIT Kerberos: Get Ticket窗口中,Pricipal 输入用户名developuser@HADOOP.COM,Password 输入密码,单击 OK。
- 在
C:\ecotesting\Fiber\conf目录下新建 jaas.conf 文件,内容如下所示:
Client {
  com.sun.security.auth.module.Krb5LoginModule required
  useKeyTab=false
  useTicketCache=true
  debug=true;
};
C:\ecotesting\Fiber\conf\fiber.xml。
Hive的JDBC配置示例:
<jdbc>
  <identify>hive</identify>
  <describe>hive jdbc configuration</describe>
  <driverClass>org.apache.hive.jdbc.HiveDriver</driverClass>
  <securityClass>com.huawei.fiber.DefaultAuthenticationCallback</securityClass>
  <classPath>C:\\ecotesting\\Fiber\\Hive\\config;C:\\ecotesting\\Fiber\\Hive\\Beeline\\lib;C:\\ecotesting\\Fiber\\Hive\\Beeline\\conf</classPath>
  <jdbcUrl>jdbc:hive2://172.16.4.21:24002,172.16.4.22:24002,172.16.4.23:24002/;serviceDiscoveryMode=zooKeeper;zooKeeperNamespace=hiveserver2;sasl.qop=auth-conf;auth=KERBEROS;principal=hive/hadoop.hadoop.com@HADOOP.COM</jdbcUrl>
  <properties>
    <property>
      <name>java.security.krb5.conf</name>
      <value>C:\\ecotesting\\Fiber\\conf\\krb5.conf</value>
    </property>
    <property>
      <name>java.security.auth.login.config</name>
      <value>C:\\ecotesting\\Fiber\\conf\\jaas.conf</value>
    </property>
    <property>
      <name>zookeeper.server.principal</name>
      <value>zookeeper/hadoop.hadoop.com</value>
    </property>
    <property>
      <name>zookeeper.kinit</name>
      <value>C:\\Program Files\\Java\\jdk1.8.0_202\\jre\\bin\\kinit.exe</value>
    </property>
  </properties>
</jdbc>
Spark2x的JDBC配置示例:
<jdbc>
  <identify>Spark2x</identify>
  <describe>Spark2x jdbc configuration</describe>
  <driverClass>org.apache.hive.jdbc.HiveDriver</driverClass>
  <securityClass>com.huawei.fiber.DefaultAuthenticationCallback</securityClass>
  <classPath>C:\\ecotesting\\Fiber\\Spark2x\\spark\\conf;C:\\ecotesting\\Fiber\\Spark2x\\spark\\jars</classPath>
  <jdbcUrl>jdbc:hive2://172.16.4.21:24002,172.16.4.22:24002,172.16.4.23:24002/;serviceDiscoveryMode=zooKeeper;zooKeeperNamespace=sparkthriftserver2x;saslQop=auth-conf;auth=KERBEROS;principal=spark2x/hadoop.hadoop.com@HADOOP.COM</jdbcUrl>
  <properties>
  <property>
    <name>java.security.krb5.conf</name>
    <value>C:\\ecotesting\\Fiber\\conf\\krb5.conf</value>
  </property>
  <property>
    <name>java.security.auth.login.config</name>
    <value>C:\\ecotesting\\Fiber\\conf\\jaas.conf</value>
  </property>
  <property>
    <name>zookeeper.server.principal</name>
    <value>zookeeper/hadoop.hadoop.com</value>
  </property>
  <property>
    <name>zookeeper.kinit</name>
    <value>C:\\Program Files\\Java\\jdk1.8.0_202\\jre\\bin\\kinit.exe</value>
  </property>
  </properties>
</jdbc>
Phoenix的JDBC配置示例:
<jdbc>
  <identify>phoenix</identify>
  <describe>phoenix jdbc configuration</describe>
  <driverClass>org.apache.phoenix.jdbc.PhoenixDriver</driverClass>
  <securityClass>com.huawei.fiber.DefaultAuthenticationCallback</securityClass>
  <classPath>C:\\ecotesting\\Fiber\\HBase\\hbase\\lib;C:\\ecotesting\\Fiber\\HBase\\hbase\\conf</classPath>
  <jdbcUrl>jdbc:phoenix</jdbcUrl>
  <properties>
    <property>
      <name>java.security.krb5.conf</name>
      <value>C:\\ecotesting\\Fiber\\conf\\krb5.conf</value>
    </property>
    <property>
      <name>java.security.auth.login.config</name>
      <value>C:\\ecotesting\\Fiber\\conf\\jaas.conf</value>
    </property>
    <property>
      <name>zookeeper.server.principal</name>
      <value>zookeeper/hadoop.hadoop.com</value>
    </property>
    <property>
      <name>zookeeper.kinit</name>
      <value>C:\\Program Files\\Java\\jdk1.8.0_202\\jre\\bin\\kinit.exe</value>
    </property>
  </properties>
</jdbc>
使用keytab认证方式配置
-
在
C:\ecotesting\Fiber\conf目录下新建 jaas.conf 文件,示例如下:Client { com.sun.security.auth.module.Krb5LoginModule required useKeyTab=true keyTab="C:\\ecotesting\\Fiber\\conf\\user.keytab" principal="developuser" useTicketCache=false storeKey=true debug=true; }; -
修改配置文件
C:\ecotesting\Fiber\conf\fiber.xml。
Hive的JDBC配置示例:
<jdbc>
  <identify>hive</identify>
  <describe>hive jdbc configuration</describe>
  <driverClass>org.apache.hive.jdbc.HiveDriver</driverClass>
  <securityClass>com.huawei.fiber.DefaultAuthenticationCallback</securityClass>
  <classPath>C:\\ecotesting\\Fiber\\Hive\\config;C:\\ecotesting\\Fiber\\Hive\\Beeline\\lib;C:\\ecotesting\\Fiber\\Hive\\Beeline\\conf</classPath>
  <jdbcUrl>jdbc:hive2://172.16.4.21:24002,172.16.4.22:24002,172.16.4.23:24002/;serviceDiscoveryMode=zooKeeper;zooKeeperNamespace=hiveserver2;sasl.qop=auth-conf;auth=KERBEROS;principal=hive/hadoop.hadoop.com@HADOOP.COM;user.principal=developuser;user.keytab=C:/ecotesting/Fiber/conf/user.keytab</jdbcUrl>
   <properties>
    <property>
      <name>java.security.krb5.conf</name>
      <value>C:\\ecotesting\\Fiber\\conf\\krb5.conf</value>
    </property>
    <property>
      <name>java.security.auth.login.config</name>
      <value>C:\\ecotesting\\Fiber\\conf\\jaas.conf</value>
    </property>
    <property>
      <name>zookeeper.server.principal</name>
      <value>zookeeper/hadoop.hadoop.com</value>
    </property>
    <property>
      <name>zookeeper.kinit</name>
      <value>C:\\Program Files\\Java\\jdk1.8.0_202\\jre\\bin\\kinit.exe</value>
    </property>
  </properties>
</jdbc>
Spark2x的JDBC配置示例:
<jdbc>
  <identify>Spark2x</identify>
  <describe>Spark2x jdbc configuration</describe>
  <driverClass>org.apache.hive.jdbc.HiveDriver</driverClass>
  <securityClass>com.huawei.fiber.DefaultAuthenticationCallback</securityClass>
  <classPath>C:\\ecotesting\\Fiber\\Spark2x\\spark\\conf;C:\\ecotesting\\Fiber\\Spark2x\\spark\\jars</classPath>
  <jdbcUrl>jdbc:hive2://172.16.4.21:24002,172.16.4.22:24002,172.16.4.23:24002/;serviceDiscoveryMode=zooKeeper;zooKeeperNamespace=sparkthriftserver2x;saslQop=auth-conf;auth=KERBEROS;principal=spark2x/hadoop.hadoop.com@HADOOP.COM;user.principal=developuser;user.keytab=C:/ecotesting/Fiber/conf/user.keytab</jdbcUrl>
  <properties>
  <property>
    <name>java.security.krb5.conf</name>
    <value>C:\\ecotesting\\Fiber\\conf\\krb5.conf</value>
  </property>
  <property>
    <name>java.security.auth.login.config</name>
    <value>C:\\ecotesting\\Fiber\\conf\\jaas.conf</value>
  </property>
  <property>
    <name>zookeeper.server.principal</name>
    <value>zookeeper/hadoop.hadoop.com</value>
  </property>
  <property>
    <name>zookeeper.kinit</name>
    <value>C:\\Program Files\\Java\\jdk1.8.0_202\\jre\\bin\\kinit.exe</value>
  </property>
  </properties>
</jdbc>
Phoenix的JDBC配置示例:
<jdbc>
  <identify>phoenix</identify>
  <describe>phoenix jdbc configuration</describe>
  <driverClass>org.apache.phoenix.jdbc.PhoenixDriver</driverClass>
  <securityClass>com.huawei.fiber.DefaultAuthenticationCallback</securityClass>
  <classPath>C:\\ecotesting\\Fiber\\HBase\\hbase\\lib;C:\\ecotesting\\Fiber\\HBase\\hbase\\conf</classPath>
  <jdbcUrl>jdbc:phoenix:172.16.4.21,172.16.4.22,172.16.4.23:24002:/hbase</jdbcUrl>
  <properties>
    <property>
      <name>java.security.krb5.conf</name>
      <value>C:\\ecotesting\\Fiber\\conf\\krb5.conf</value>
    </property>
    <property>
      <name>java.security.auth.login.config</name>
      <value>C:\\ecotesting\\Fiber\\conf\\jaas.conf</value>
    </property>
    <property>
      <name>zookeeper.server.principal</name>
      <value>zookeeper/hadoop.hadoop.com</value>
    </property>
    <property>
      <name>zookeeper.kinit</name>
      <value>C:\\Program Files\\Java\\jdk1.8.0_202\\jre\\bin\\kinit.exe</value>
    </property>
  </properties>
</jdbc>
- 对接Phoenix时,需要修改配置文件
C:\ecotesting\Fiber\HBase\hbase\conf\hbase-site.xml新增属性 hbase.myclient.keytab 和 hbase.myclient.principal。
<property>
  <name>hbase.myclient.keytab</name>
  <value>C:\\ecotesting\\Fiber\\conf\\user.keytab</value>
</property>
<property>
  <name>hbase.myclient.principal</name>
  <value>developuser</value>
</property>
DbVisualizer对接Fiber
操作场景
DbVisualizer通过Fiber方式对接FusionInsight HD的Hive、Spark2x、Phoenix组件。
前提条件
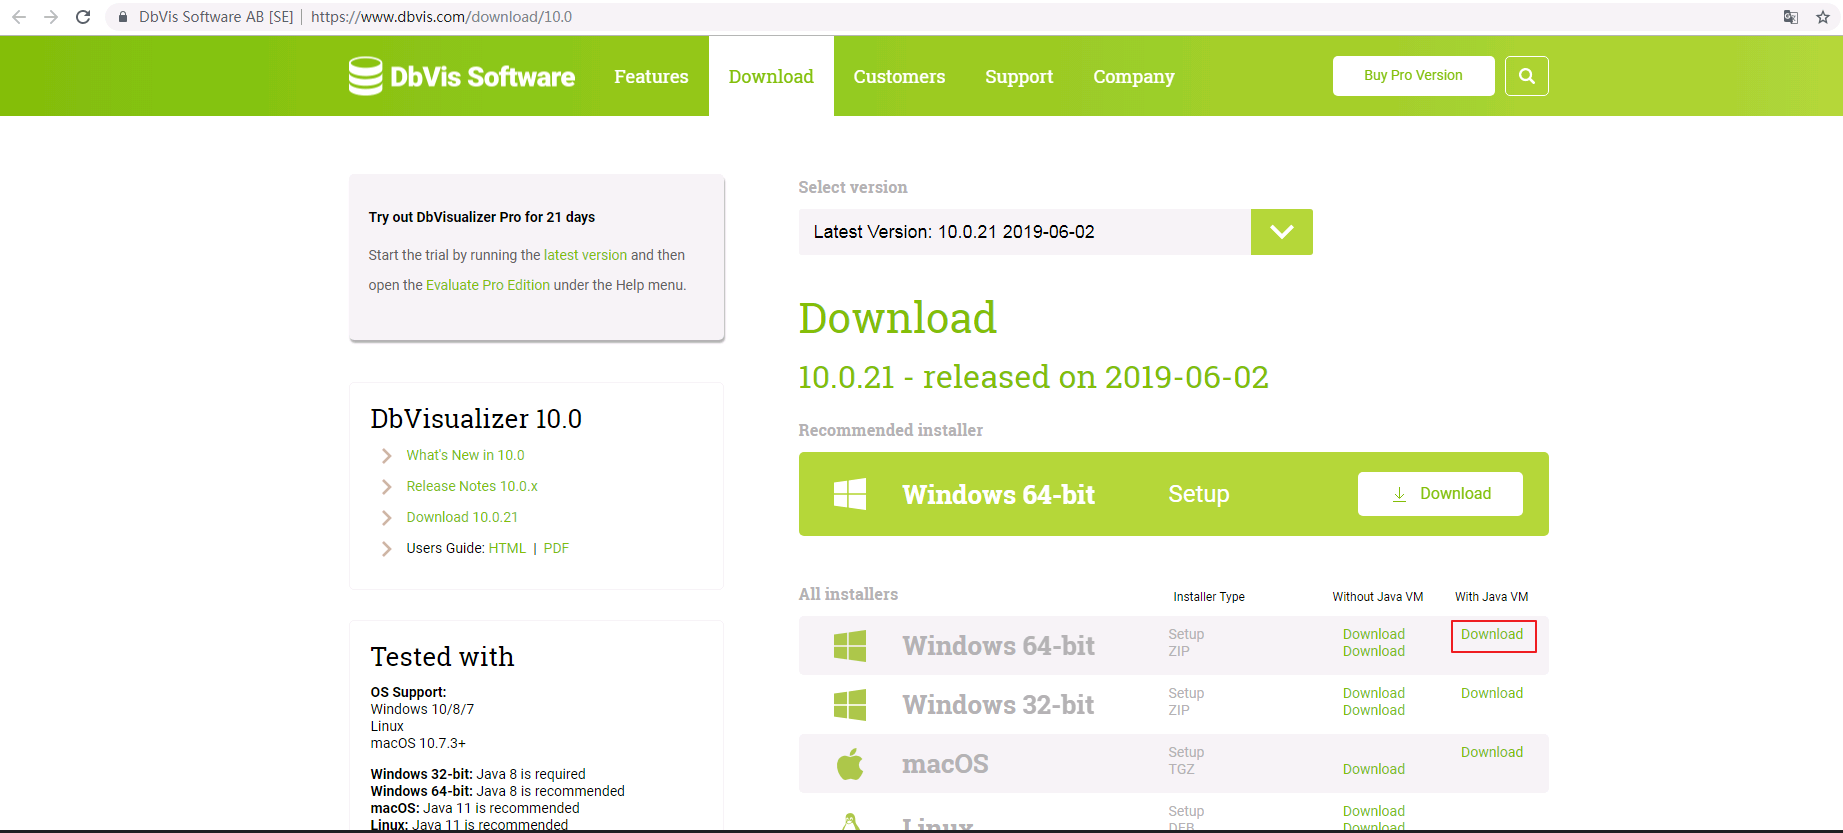
- 从http://www.dbvis.com/download/下载与本地系统相对应的DbVisualizer软件,并完成安装。可按照默认选项完成安装。
操作步骤
DbVisualizer通过Fiber对接Hive
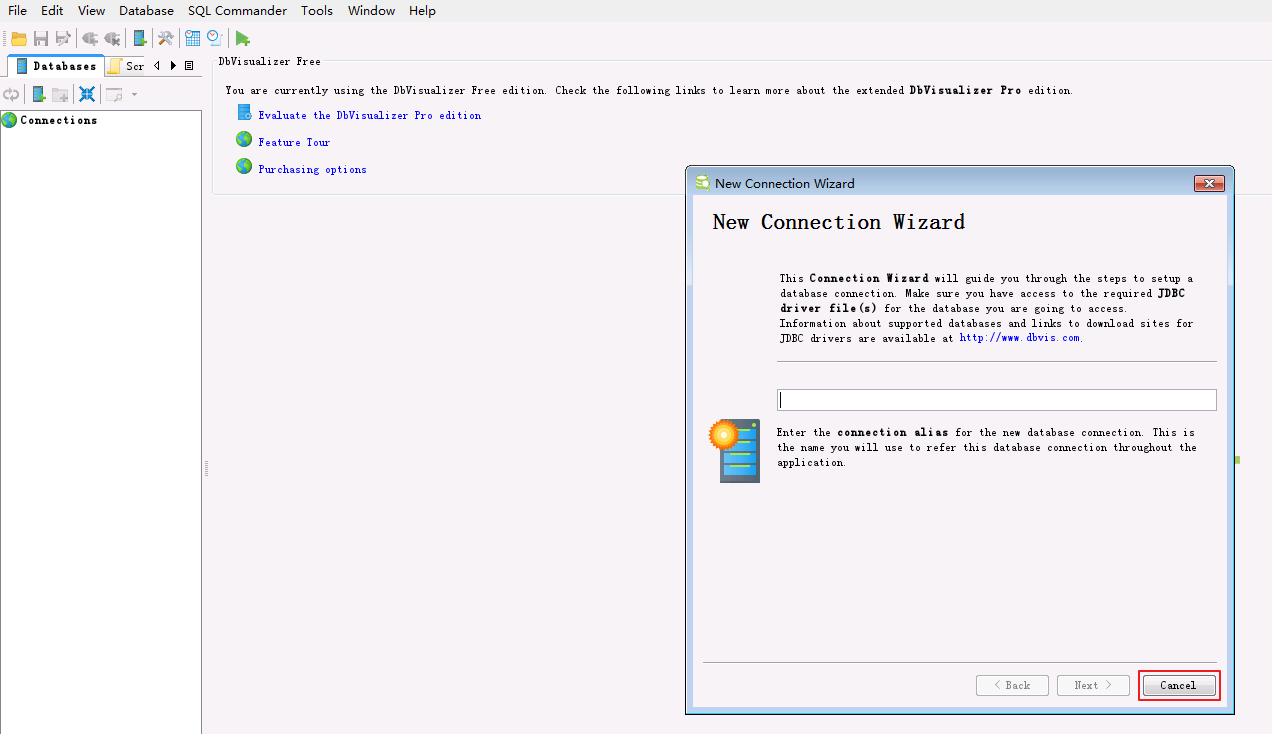
- 打开DbVisualizer,点击 Cancel。
- 菜单栏选择
Tools->Driver Manager。

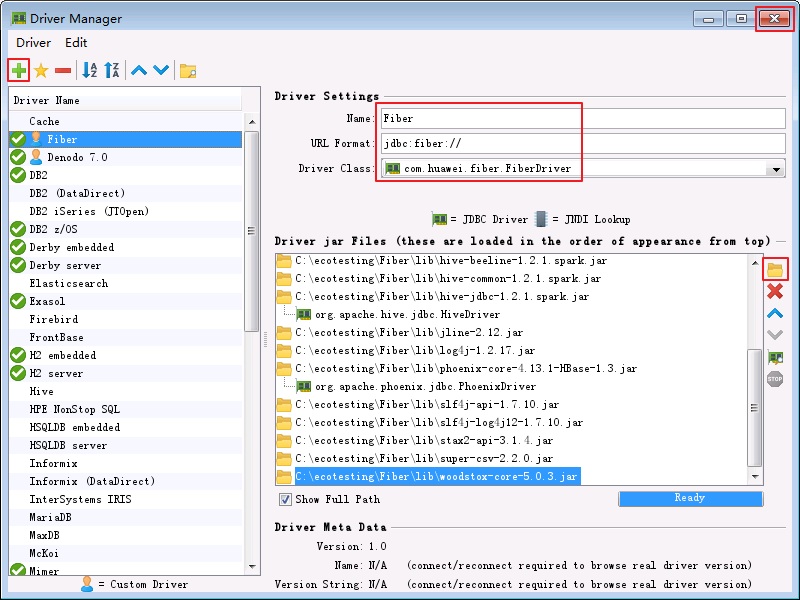
- 点击
 新建driver。信息填写完毕后,关闭该窗口。
填写信息示例如下:
Name:Fiber(自定义)
URL Format:jdbc:fiber://
Dirver jar Files: 将C:\ecotesting\Fiber\lib目录下所有的jar包加入
Class Name:com.huawei.fiber.FiberDriver(添加jar包后从下拉框中选择)
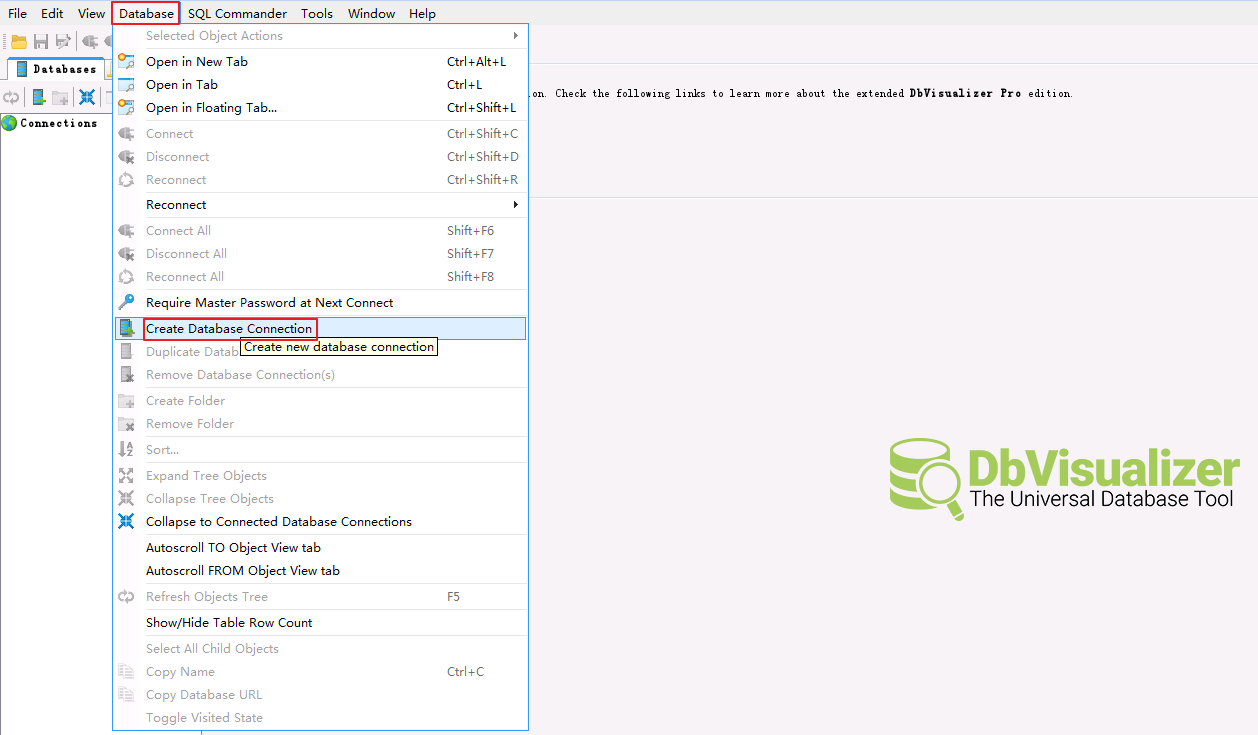
- 菜单栏选择
Database-> Create Database Connection。
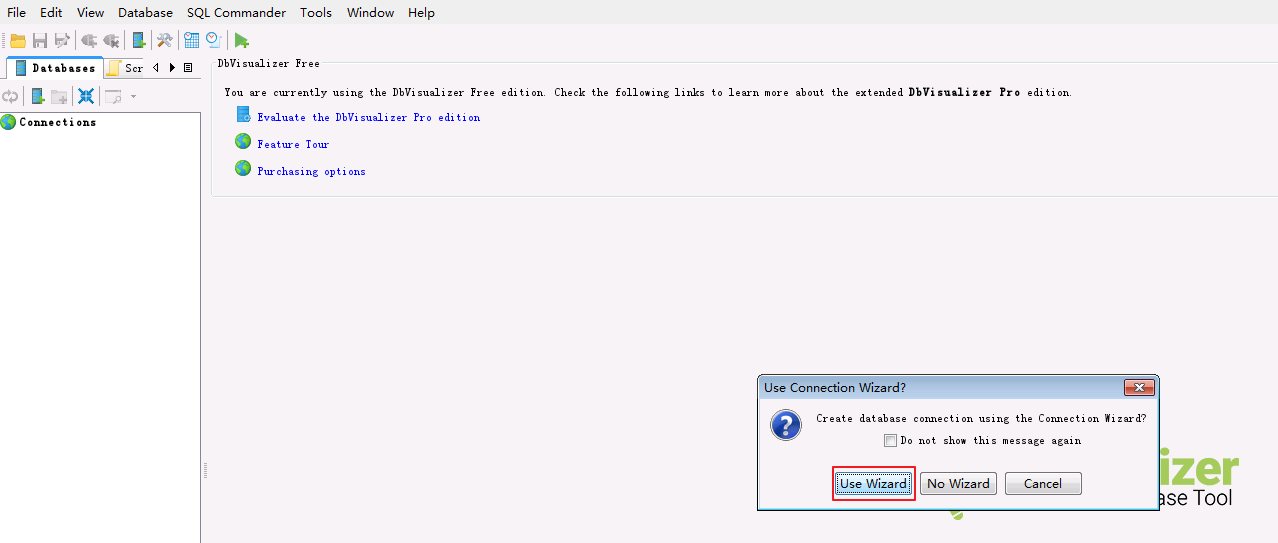
- 选择 Use Wizard。
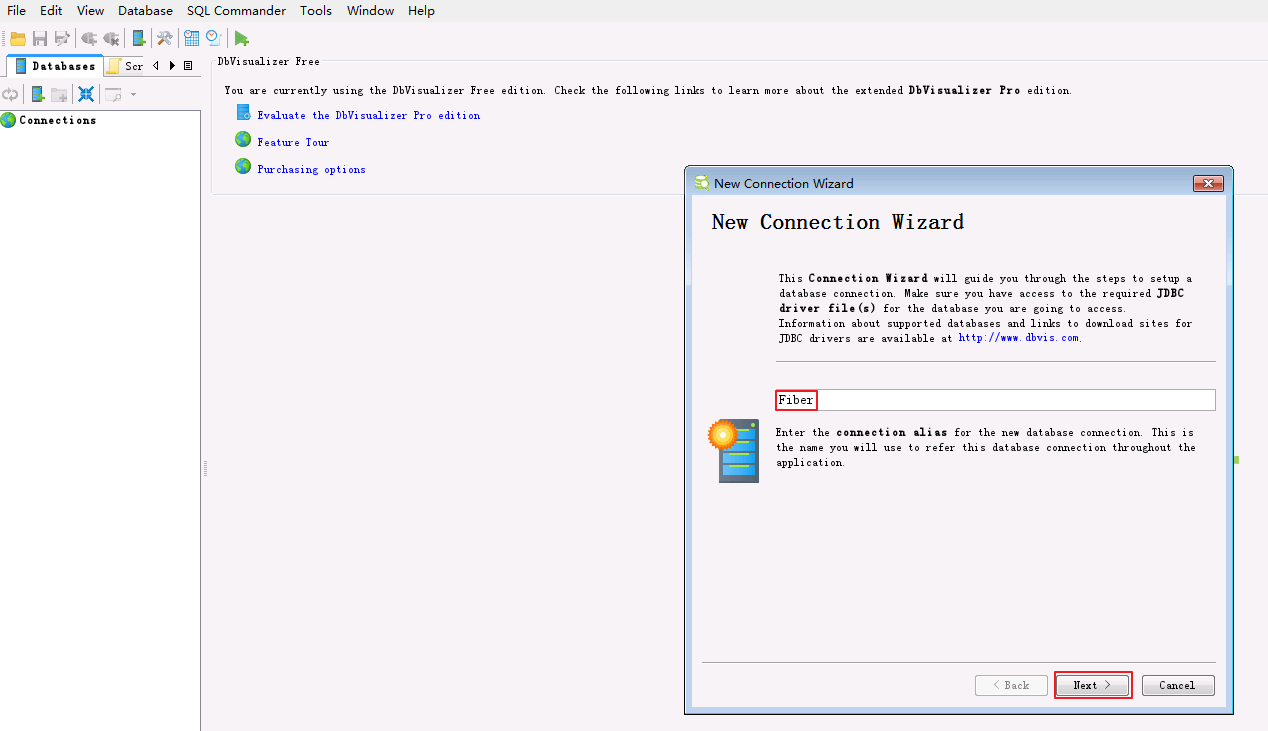
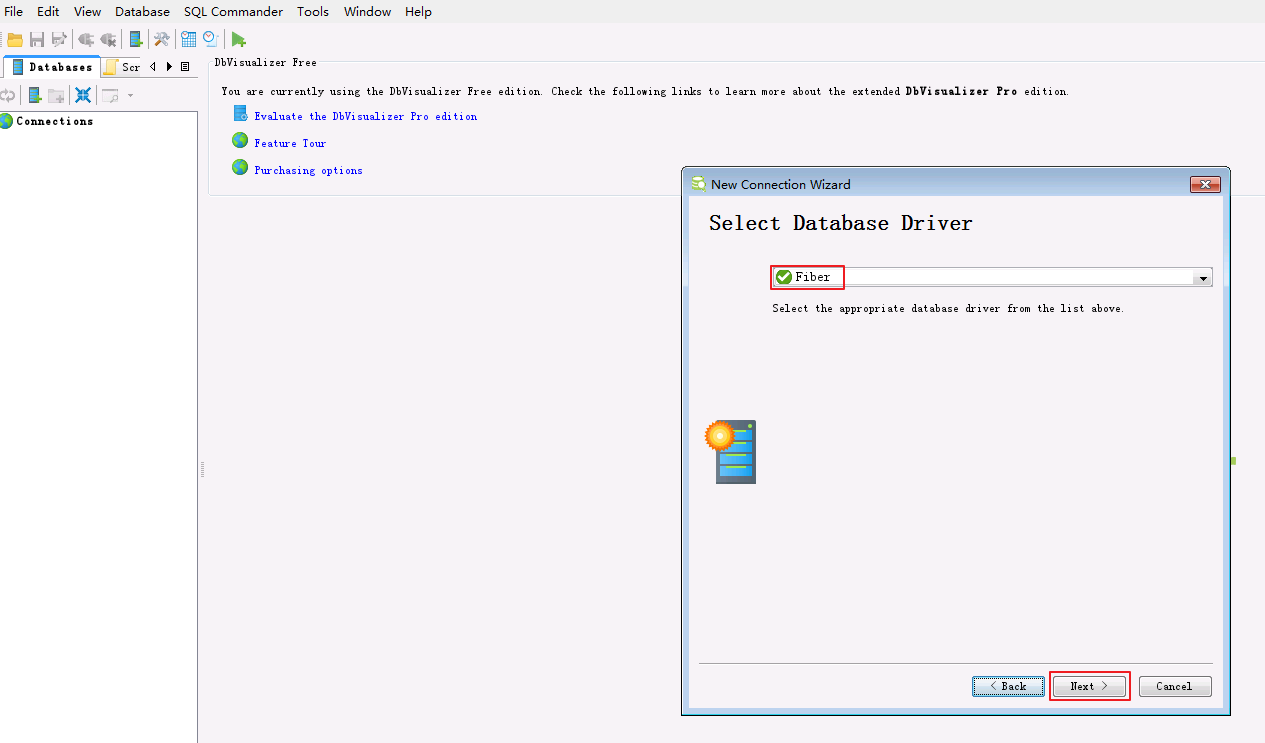
- 自定义连接名称,例如 Fiber ,点击 Next 。
- 选择数据库Driver。在下拉框中选择 Fiber 。
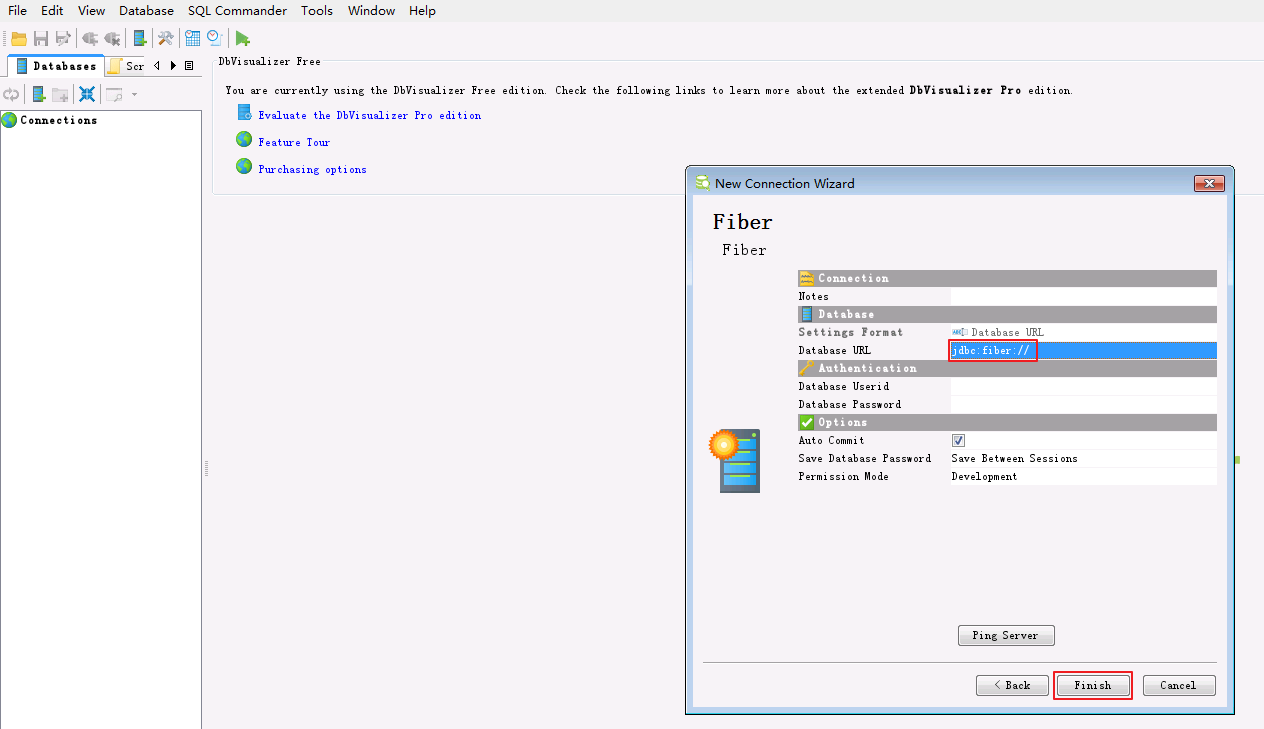
- 填写 Database URL = jdbc:fiber:// ,其余的可不填写。点击 Finish 完成配置。
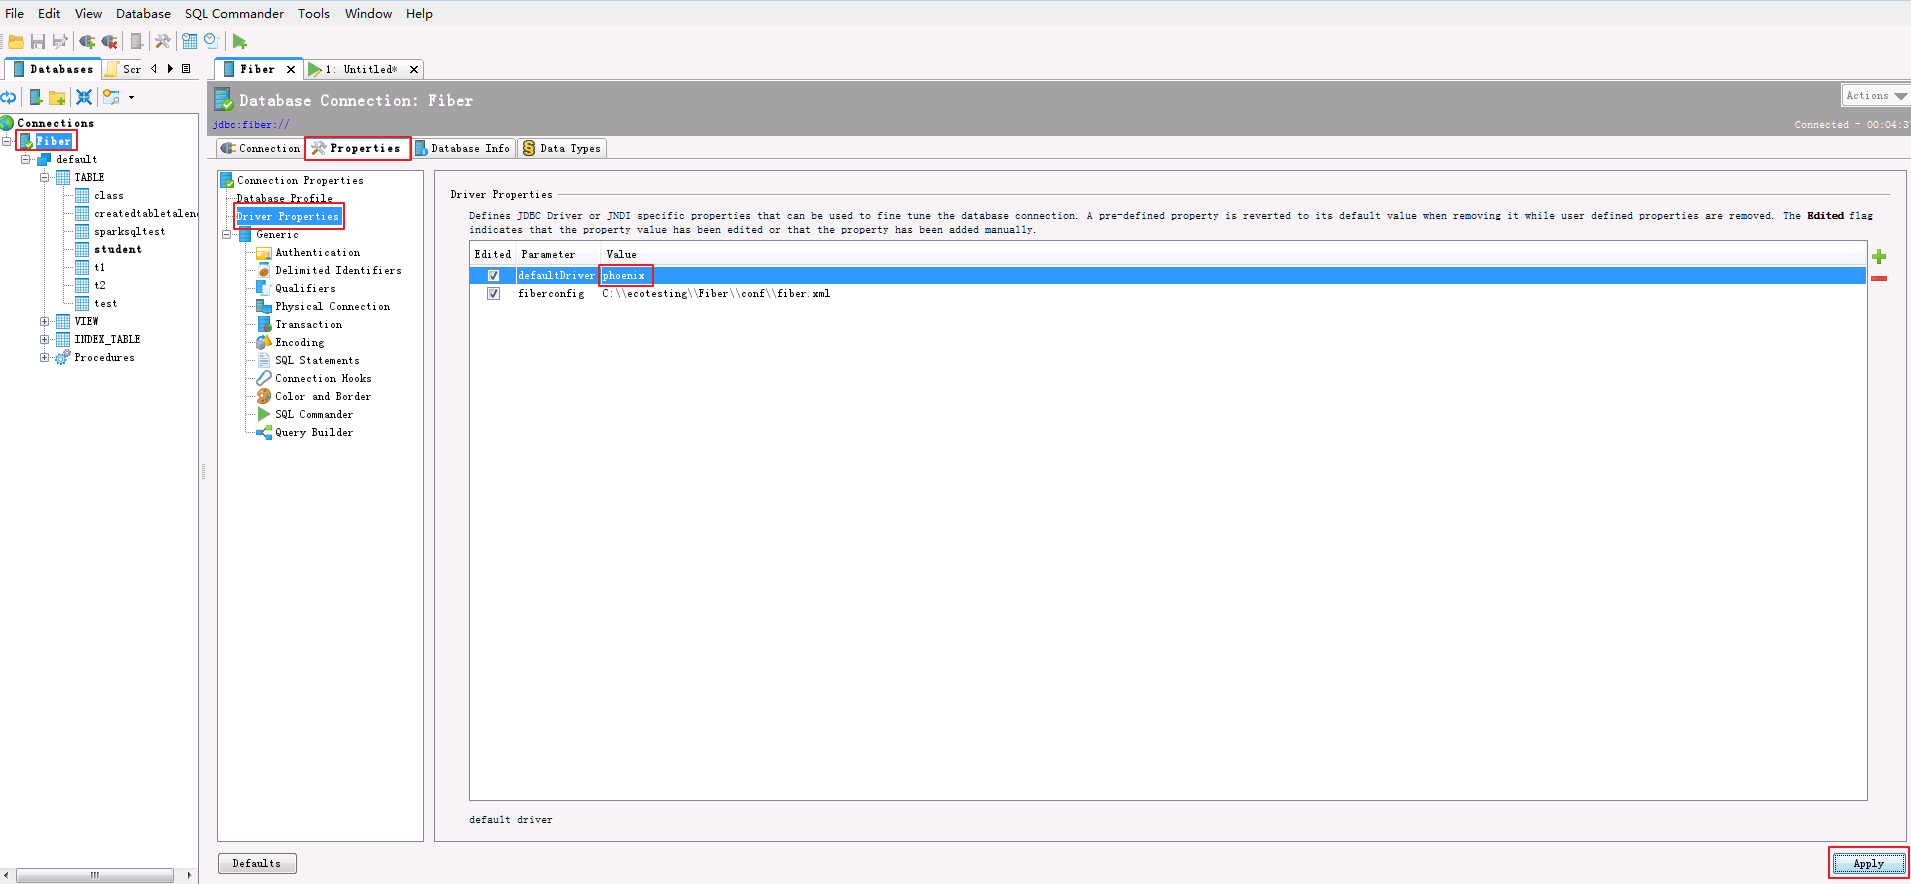
- 选择
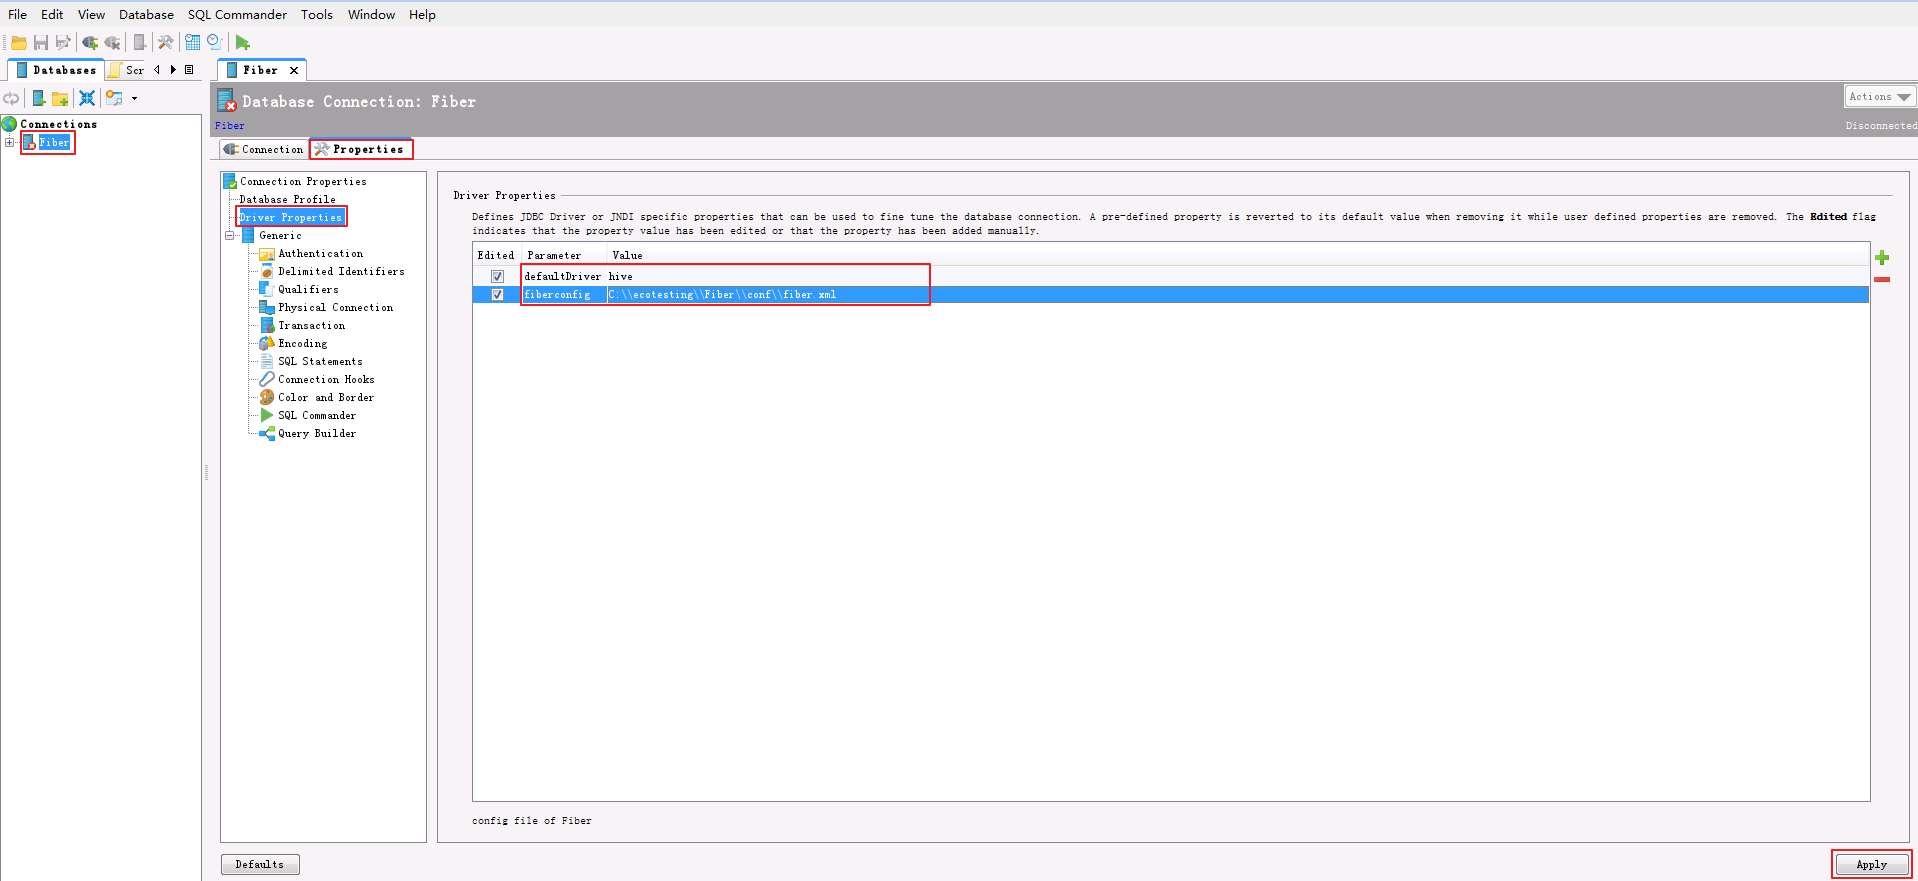
Databases->Connections->Fiber,选择 Properties 面板,填写 defaultDriver = hive 和 fiberconfig = C:\\ecotesting\\Fiber\\conf\\fiber.xml ,点击 Apply 。
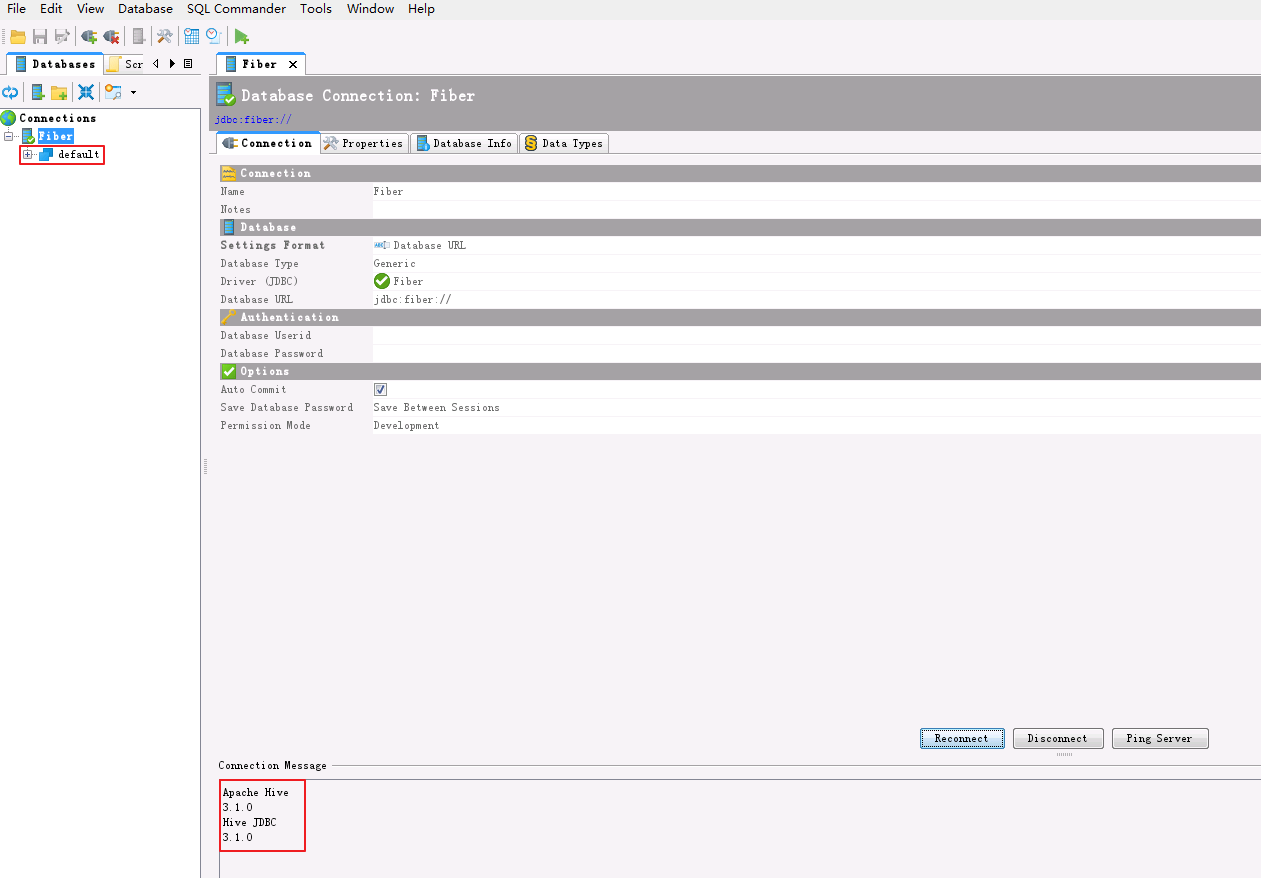
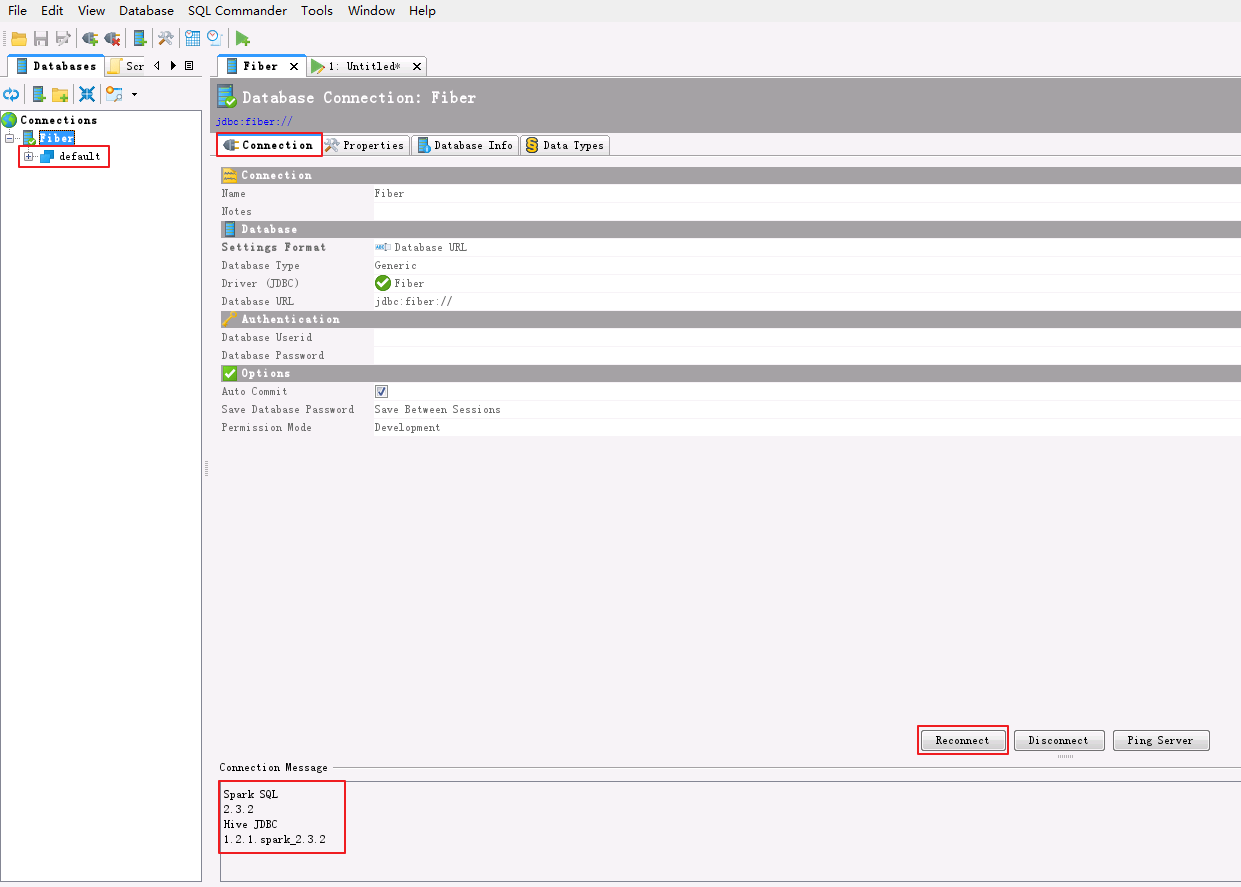
- 选择 Connection 面板,点击 Connect 按钮。
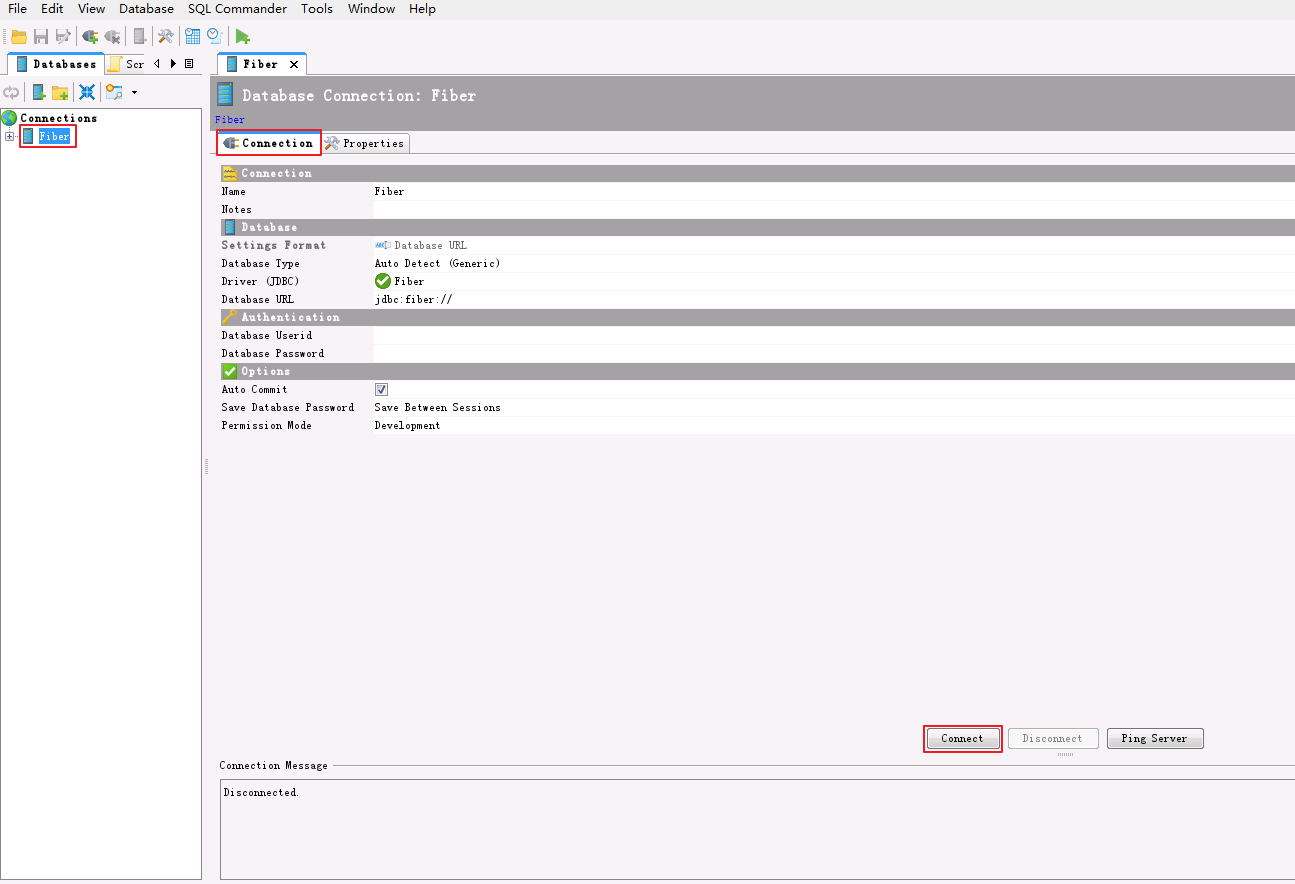
- Connection Message返回使用的Server和Driver版本信息,且返回默认数据库 default 则表示通过Fiber连接Hive成功。
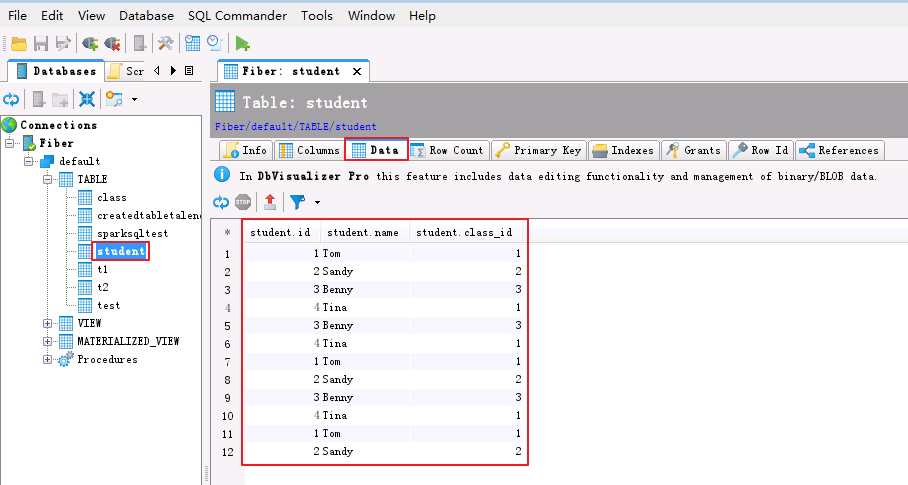
- 查看表数据。点击
default->TABLE->student->Data查看student表数据。
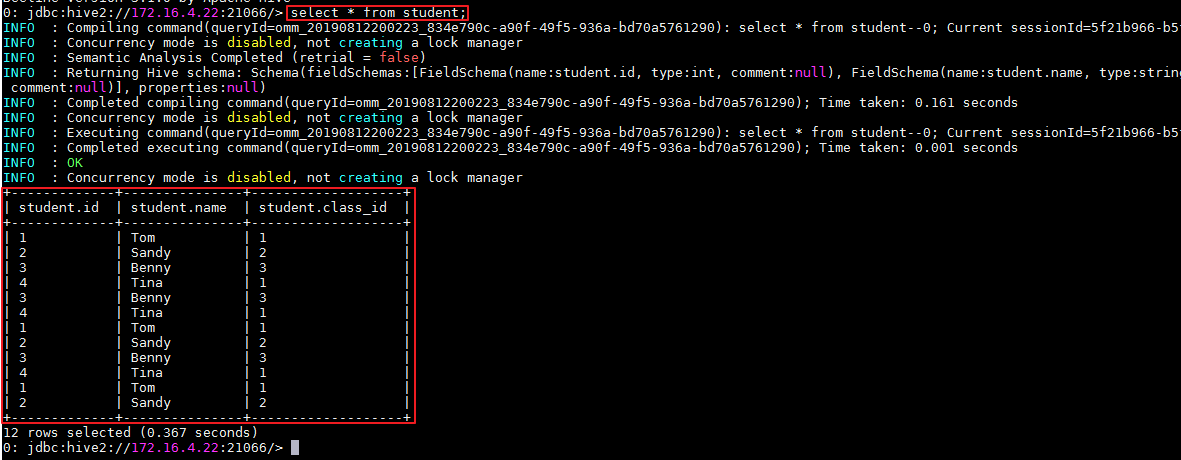
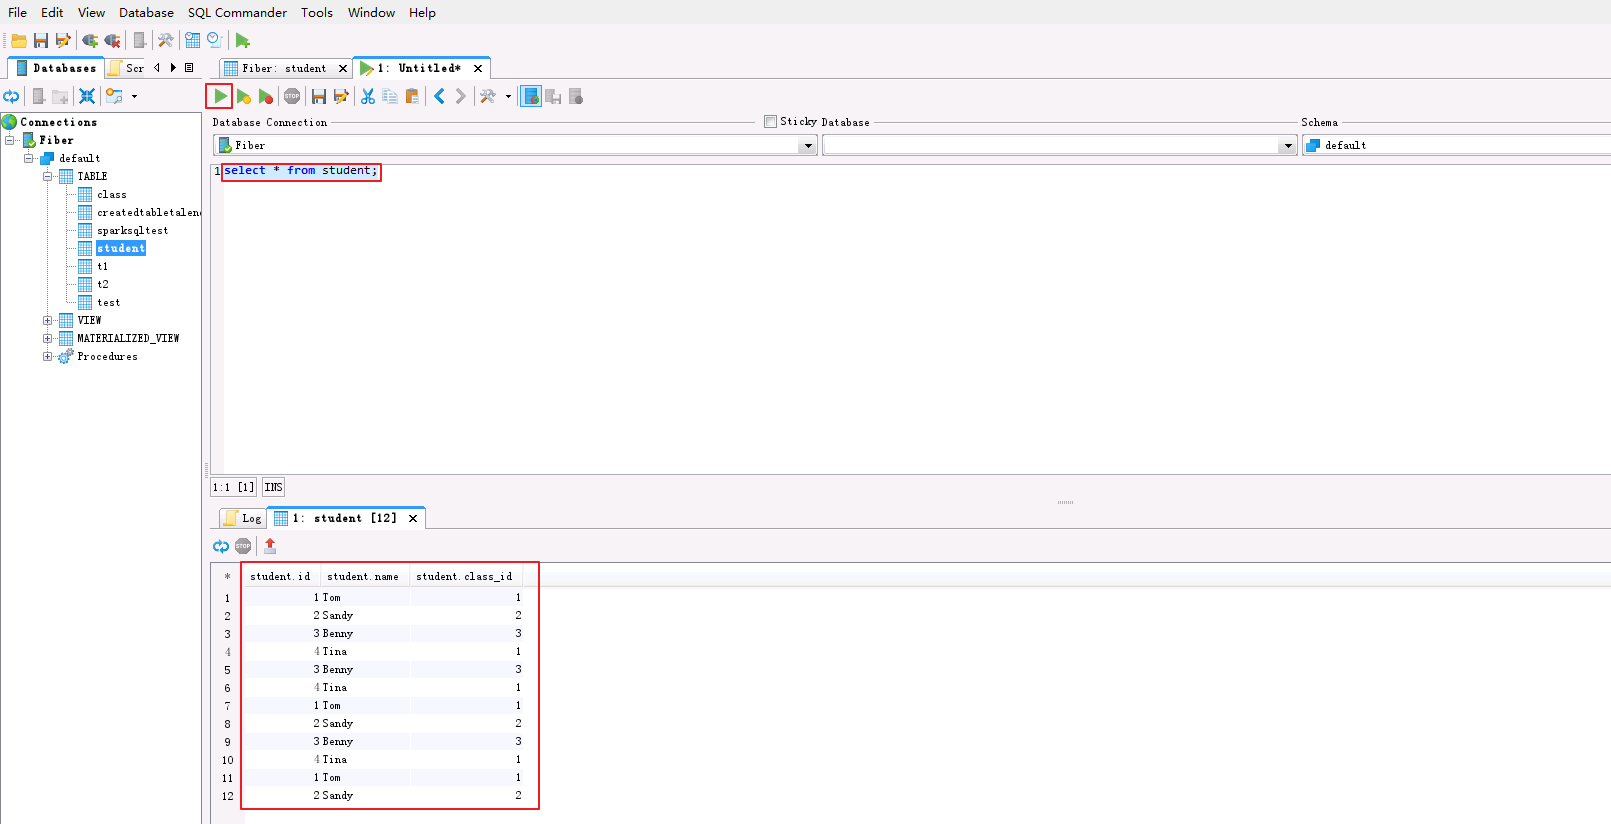
- SQL查询表数据。菜单栏选择
File->New SQL Commander,编辑查询SQL,点击 执行 按钮,查看查询结果。
select * from student;
DbVisualizer通过Fiber对接Spark2x
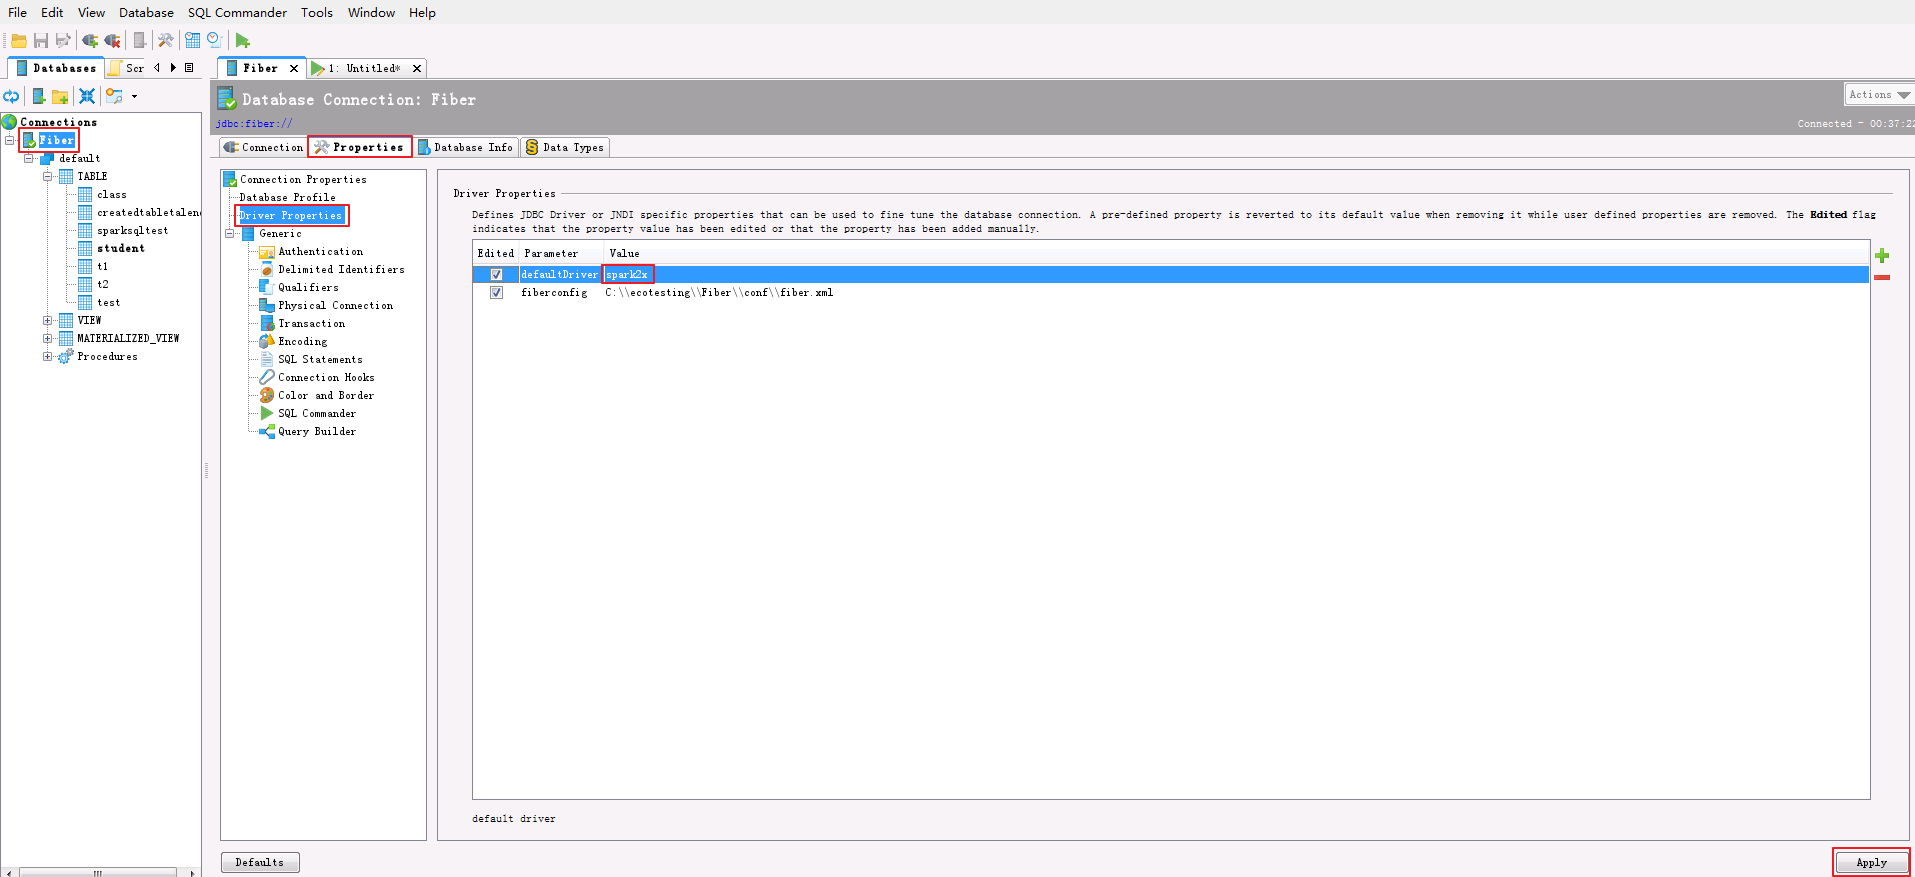
- 双击数据连接
Fiber打开DataBase Connection配置面板。选择Properties->Driver Properties,将 “defaultDriver”修改为 spark2x ,点击 Apply 。
- 选择 Connection 面板,点击 Reconnect 按钮。Connection Message返回使用的Server和Driver版本信息,且返回默认数据库 default 则表示通过Fiber连接Spark2x成功。
- 查看表数据。点击
default->TABLE->student->Data查看student表数据。
- SQL查询表数据。菜单栏选择
File->New SQL Commander,编辑查询SQL,点击 执行 按钮,查看查询结果。
select * from student;
DbVisualizer通过Fiber对接Phoenix
- 双击数据连接
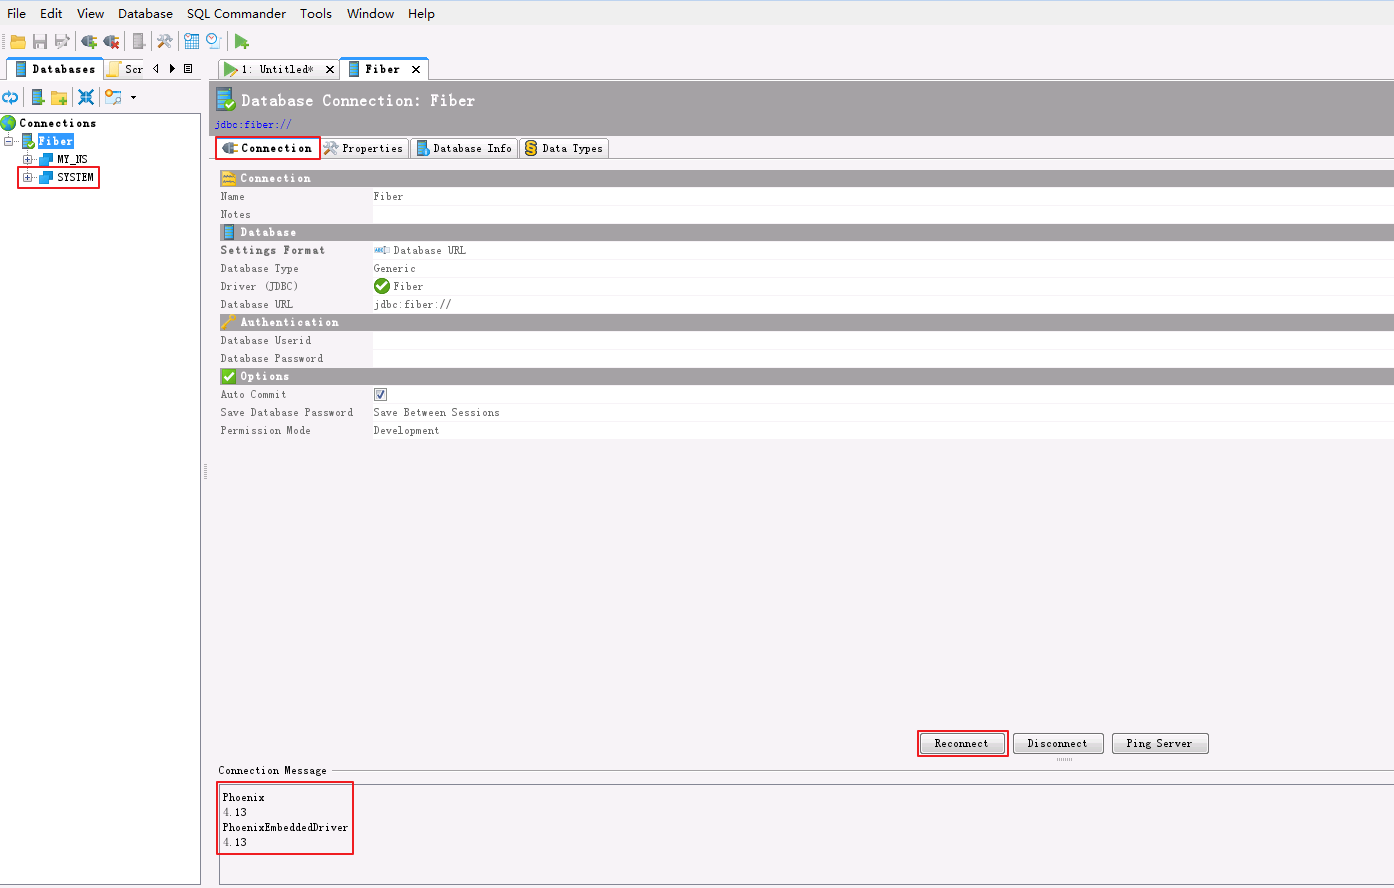
Fiber打开DataBase Connection配置面板。选择Properties->Driver Properties,将 “defaultDriver”修改为 phoenix ,点击 Apply 。
- 选择 Connection 面板,点击 Reconnect 按钮。Connection Message返回使用的Server和Driver版本信息,且返回默认数据库 SYSTEM 则表示通过Fiber连接Phoenix成功。
-
SQL操作表数据。
-
如果不存在自定义的命名空间空间“MY_NS”,则登录FusionInsight集群客户端,执行hbase shell的“create_namespace”命令创建新的命名空间 MY_NS。
create_namespace 'MY_NS'
-
创建表和数据。菜单栏选择
File->New SQL Commander,编辑SQL如下,点击 执行 按钮,查看查询结果。CREATE TABLE IF NOT EXISTS MY_NS.SQL_TEST (id integer not null primary key, name varchar); UPSERT INTO MY_NS.SQL_TEST VALUES(1,'John'); UPSERT INTO MY_NS.SQL_TEST VALUES(2,'Tom'); UPSERT INTO MY_NS.SQL_TEST VALUES(3,'Manson'); UPSERT INTO MY_NS.SQL_TEST VALUES(4,'Aurora');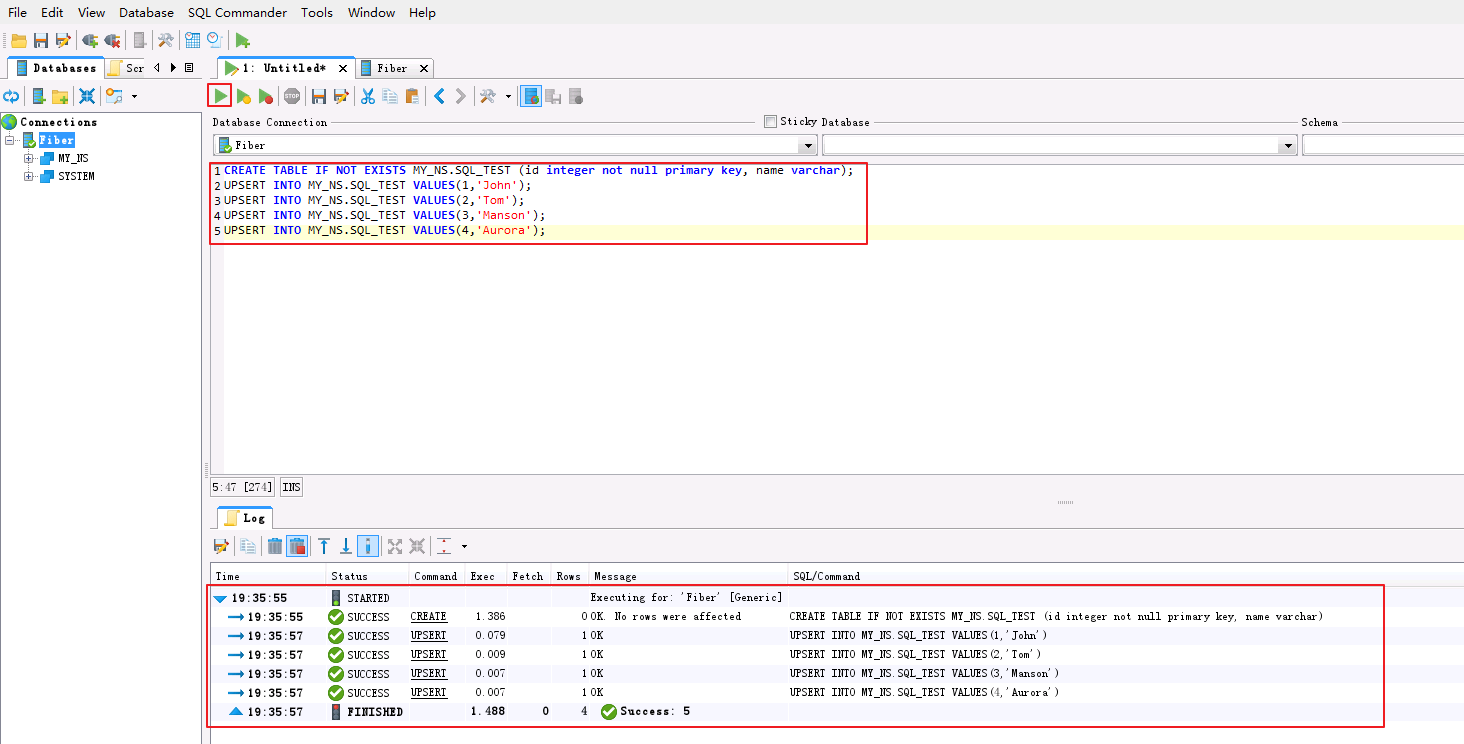
-
SQL查询表数据。编辑SQL如下,点击 执行 按钮。
select * from MY_NS.SQL_TEST;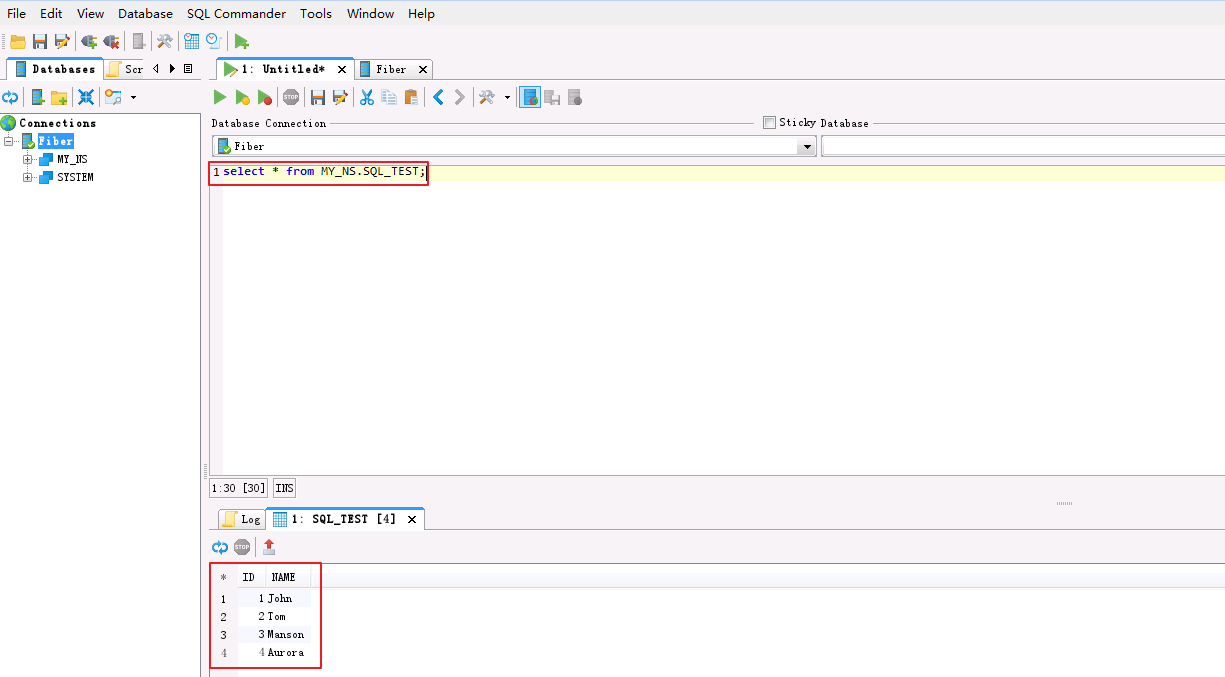
-
SQL修改表的数据。编辑SQL如下,点击 执行 按钮。
UPSERT INTO MY_NS.SQL_TEST VALUES(1,'Jessy'); -
SQL删除表的数据。编辑SQL如下,点击 执行 按钮。
DELETE FROM MY_NS.SQL_TEST WHERE ID=4; -
编辑SQL如下,点击 执行 按钮。“ID=1”的“NAME”已被修改为“Jessy”,“ID=4”的记录已被删除。
select * from MY_NS.SQL_TEST;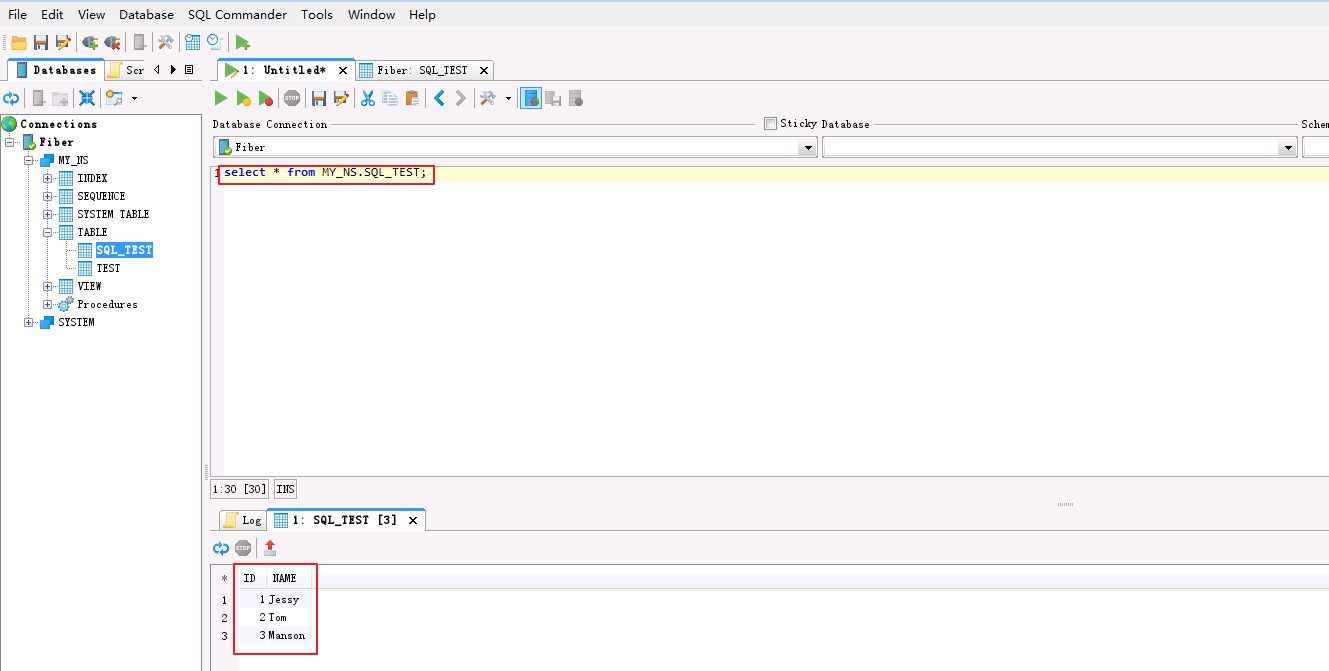
-
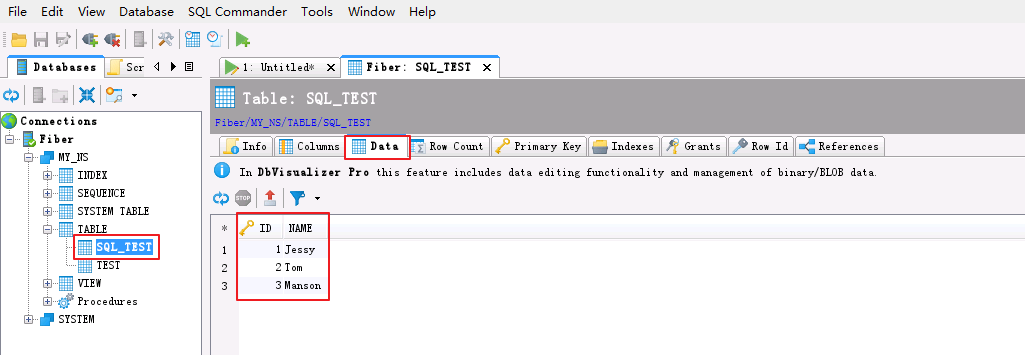
直接查看表数据。点击
MY_NS->TABLE->SQL_TEST->Data查看student表数据。
FAQ
-
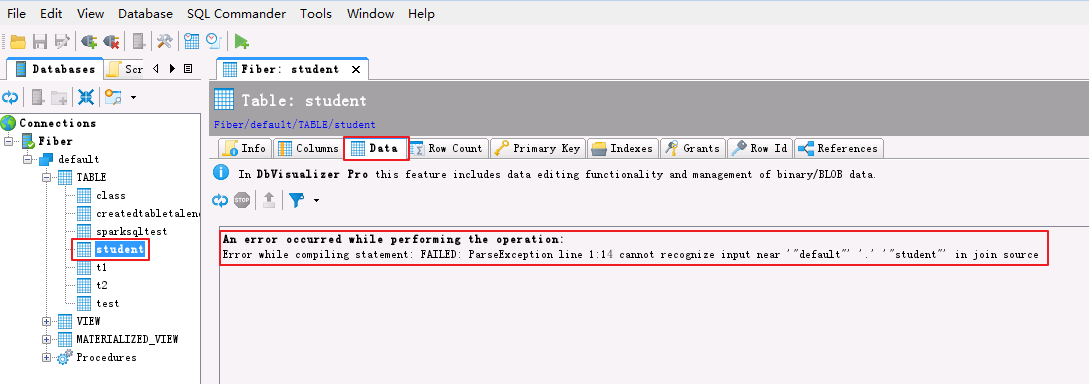
界面查看表数据时,返回ParseException line 1:14 cannot recognize input near '"default"' '.' '"student"' in join source
【问题描述】
连接上Hive后,点击
default->TABLE->student->Data查看student表数据时,返回以下错误。An error occurred while performing the operation: Error while compiling statement: FAILED: ParseException line 1:14 cannot recognize input near '"default"' '.' '"student"' in join source
【解决方法】
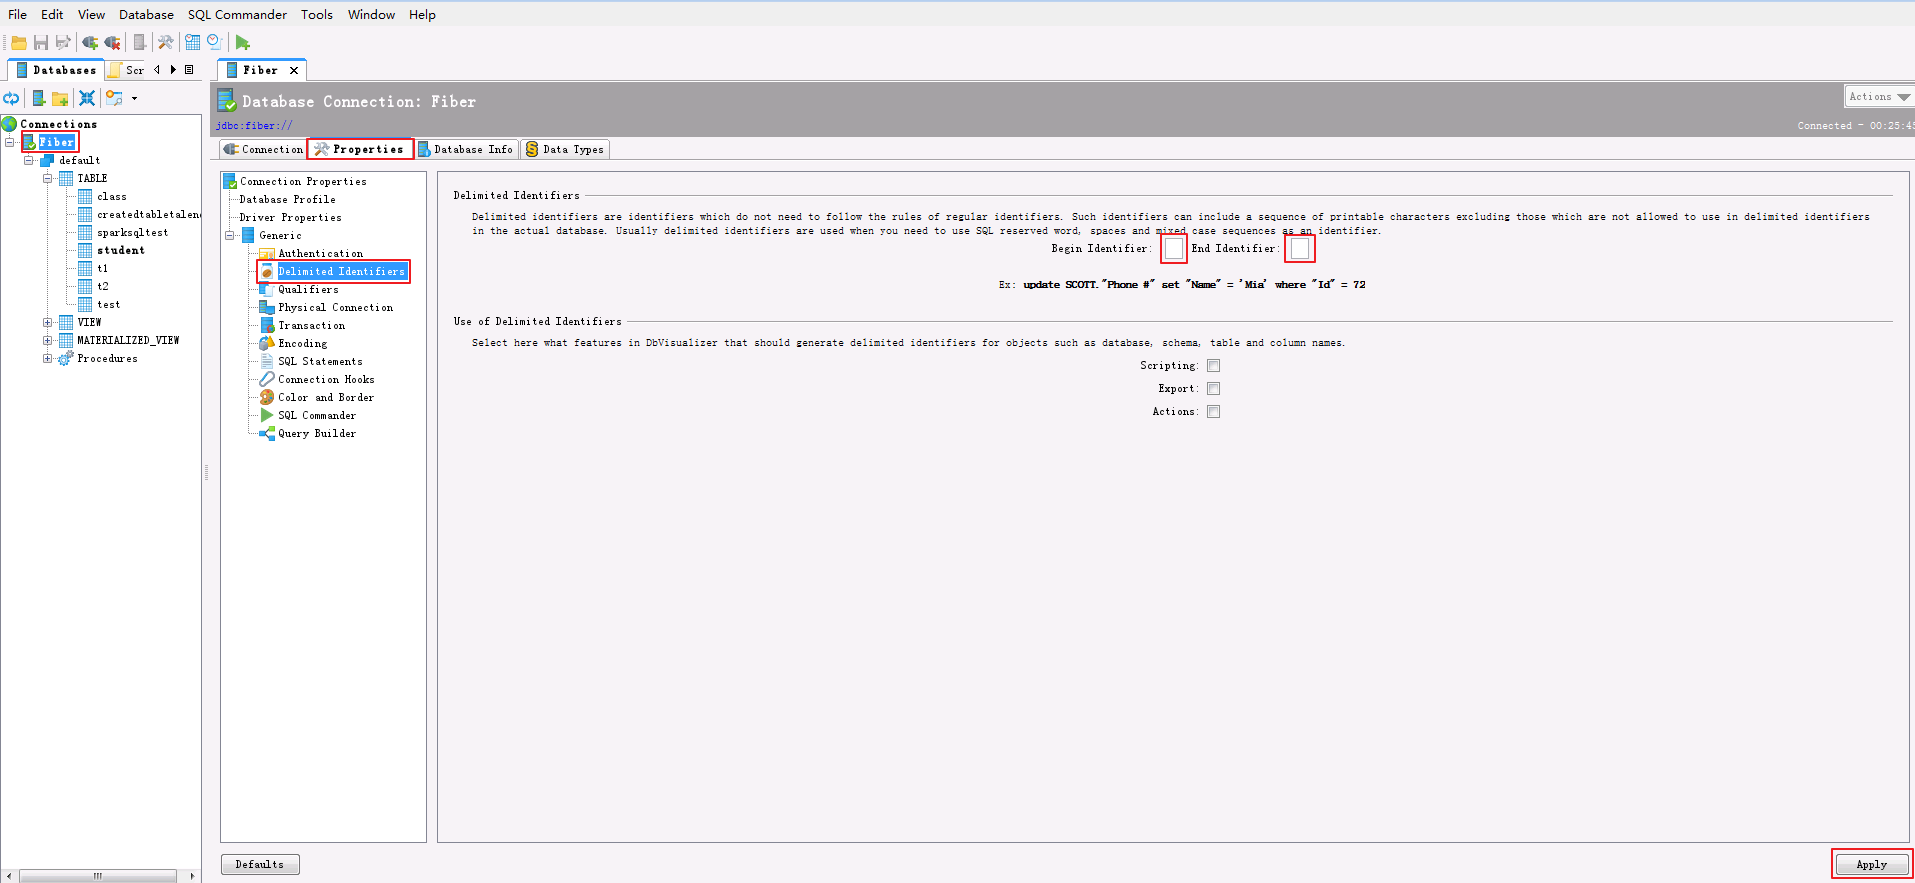
双击数据连接
Fiber打开DataBase Connection配置面板。选择Properties->Generic->Delimited Identifiers。将 Begin Identifier 和 End Identifier 的内容(例如双引号 ")清空后,点击 Apply 。